2. Open up a map in Prophet, navigate to the texture you wish to change, and click it; bringing up the Shader Edit Panel:
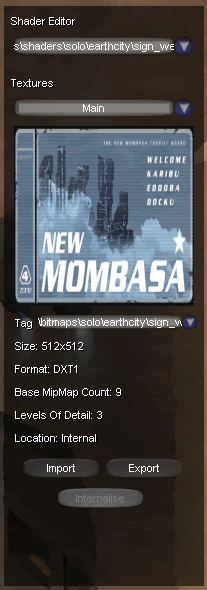
The Shader Edit Panel can look a bit daunting at first, so I'll go through it bit by bit and you'll get it in no time
First of all we have a combobox, which contains the paths of all the shader tags within the map. The currently selected one will be the one in use by the currently selected object. If you were to change the shader, the info would be immediately saved to the map file, and the changes would take effect in the editor as well.
Secondly, we have another combobox. This time containing the textures contained within the selected shader. But instead of the paths being listed, you will see the function instead. There are four functions that Prophet will recognise: "Main", "Bump Map", "Detail Map", and "Cube map". Everything else will be listed as "Unknown". By default the selected texture will be the main texture, but feel free to change that without worry: nothing will be saved to the map, instead only the panel will change to display the new function's info.
Speaking of info
And finally we have the "Import", "Export", and "Internalise" buttons.
Firstly the Internalise button will do just that, internalise. if your texture is in one of the external maps, it'll simply copy it into the current map, else...the button won't be enabled ;x
The Export button is again, simple. Just click it and extract the texture to a file somewhere. Note though that not all the bitmap formats used in Halo2 are supported by Prophet, and so you may end up with corrupt files. It is a very rare case though to get such a format in use by the BSP, so no worries
Finally the Inject button, 'tis slightly more complex. The best way to explain it would to go through the whole process, so here's how to properly export, edit, and import a texture:
- Export the texture, preferably as a DDS.
- Open the texture up in an image editor. Make sure to open only the 1st mipmap. (For this example I will be assuming you have Photoshop, along with the D3DXTextureFormat Plugin).
- Once you're done your editing/resizing. Save the texture as a DDS file. But take note: you need to save in the same format as the texture was originally, with the same amount of mipmaps as originally (if you didn't resize the texture that is. If you did resize the texture, then just save with as many mipmaps as you can (meaning the last has a width or height of less than 2). You can get the original texture's format and mipmap count from the info visible on the Shader Edit Panel. Also you may want to include a '1' somewhere in the filename.
- Now close the texture, but not photoshop yet. take a look at the 'Levels of detail' value visible on the Shader Edit Panel. That's the amount of textures we need. In the above pic it says 3, so:
- First of all goto File -> Open Recent, and select the texture you just closed (will be the first in the list). Now select the texture's 2nd mipmap level in the dialog and open it. Now save the texture, preferably with a '2' in the filename. Note that you need to keep it in the same format again, and the mipmap count has to be the same as the last texture's, or lower.
- Close the texture. Now repeat the process, only this time open up the texture you just closed, not the texture we opened before. Again select the 2nd mipmap level, and save again, preferably with a '3' in the name this time.
- Now click the Import button in Prophet. It will first ask for LOD1, so select the file that has the '1' in it's name. It will then ask for LOD2, so select the '2' file, and finally the '3' file.
- And finally just before you ftp, right-click the map file and hit resign. All done

- If you press cancel on one of the LOD dialogs, the LOD texture will not be touched in the map file. But this will mean that in-game if you move far enough away from the texture then that LOD will come into play...ruining the experience.
- If the texture you re injecting is bigger or smaller than the original texture, and the original texture is located within an external map: the new texture will be instead injected into the current map, and the pointers fixed. I though this to be a more preferable route to take than to shift everything in one of the external maps, as that would have meant no clean map would have ever worked 100% with that external map. Hope you agree
..and taht's itt ^_^