
This is a draft; will be updating with working links.
Updates:
September 29, 2007: Added Death-Zone information.
[ Basic SP -> MP Rebuilding ]
Step 1.) Make Folder Named: "Halo 2 BSP Conversion".
Step 2.) Now Inside of That Folder Make Another Folder Named: "Halo 2 Maps".
Step 3.) Now put Copies of all of your halo 2 maps in here. Make sure your using clean maps.
Step 4.) Now Make a Folder Named: "Applications".
Step 5.) Now Download THIS, THIS, and THIS, and Maybe THIS as Well to Your "Applications" Folder. Extract each program to a separate folder.
Step 6.) Open up the H2 Map-Checker and make sure all your maps are clean.
Step 7.) Now Open up H2Core and open the map that you will use as a basemap for the converted BSP.
Step 8.) Go to Map --> Decompile.
Step 9.) Wait...
Step 10.) When a box pops up saying "done" and a time-stamp below it press "enter".
Step 11.) Open up the map with a BSP you want to 'try' to convert to a multiplayer map.
Step 12.) Go to the SBSP tag and click on the BSP you want.
Step 13.) Go to Meta --> Decompile.
Step 14.) Go to Meta --> Decompile Recursive.
Step 15.) Go to the LTMP tag and click on the lightmap that corresponds to the BSP you decompiled.
Step 13.) Go to Meta --> Decompile.
Step 14.) Go to Meta --> Decompile Recursive.
Step 15.) Open up H2Guerilla.
Step 16.) Open up the scenery tag of the basemap you'll be using for the conversion. (Go to C:\tags\h2\scenario\multi\mapname\mapname.scenerio).
Step 17.) Scroll down until you see this:
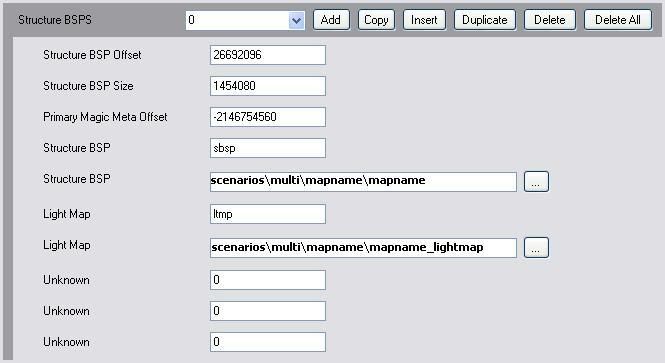
Step 18.) Just click on the:
 And change the current BSP's and Lightmaps to the BSP of the campaign level and the Lightmap of the campaign level.
Step 19.) Go to File --> Save.
Step 20.) Open H2Core again.
Step 21.) Open the basemap you are using.
Step 22.) Go to Map --> Rebuild.
Step 23.) Check all the boxes and find the scenario of your basemap ( c:\h2\scenarios\multi\mapname\mapname.scenario).

Step 24.) Press "Rebuild".
Step 25.) Wait...
Step 26.) When a box pops up saying "done" and a time-stamp below it press "enter".
Step 27.) Edit player spawn, weapon spawn, collection spawn, or whatever other spawns you need to edit to make the map a fully functional halo 2 multiplayer map.
[ Things to Try if This Does Not Work ]
1.) Try it again
2.) Delete the entire "tags" folder from the "C:\" drive and repeat steps 7-27
3.) When rebuilding map try not selecting machs, sound scenery, or looping sounds in the rebuilder dialog.
4.) Try to find the BSP converted map HERE and just patch it to the correct basemap.
[ Death-Zones ]
[ Proper method ]
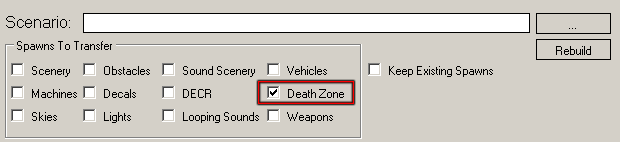
Step 1.) Simply use the updated version of H2C and select the option for building in death-zones when you rebuild in step# 24 of basic SP -> MP BSP rebuilding.
[ Improper Method ]
Step 1.) Use Gemini* as the basemap when doing the basic SP -> MP BSP rebuilding guide.
Since Gemini's death-zone is so large it is really only ideal if you want to block off a large section of map, or create a limit to the players height or depth in relation to the BSP.
You can do something more though if you want to add a death-zone for at the end of a corridor or at some other location you do not want the player to get at, or the normal Gemini death-zone is just the wrong size.
[ Add More Death-Zones ]
Step 1.) Open your rebuilt map in Entity 1.3.9 and go to the scenario tag.
Step 2.) Go to Meta Tools -> Reference editor.
Step 3.) Right click -> Chunk Cloner
Step 4.) Scroll down until you see the reflexive named "Death Zones".
Step 5.) Expand this reflexive by clicking on the "+" button.
Step 6.) Highlight the death-zone chunk named "kill-balcony". Which is Gemini's death-zone.
Step 7.) Press the button labelled "Copy To Clip Board".
Step 8.) Press the button labelled "Add To Selected Reflex/Chunk".
Step 9.) Press the button labelled "Add Meta To Map".
You just added another death-zone to you map! however it will spawn in the exact same place as the original one so you will not be able to see a difference in-game or in Entitys BSP viewer until you change where it spawn/or its size.
[ Add More Death-Zones ]
As I mentioned earlier Gemini's death-zone is very big so if you plan on using it to block out a small location then you will probably have to re-size it.
Step 1.) Open your rebuilt map in Entity 1.3.9 and go to the scenario tag.
Step 2.) Go to Meta Tools -> Meta Editor.
Step 3.) Scroll down to the death-zone reflexive:
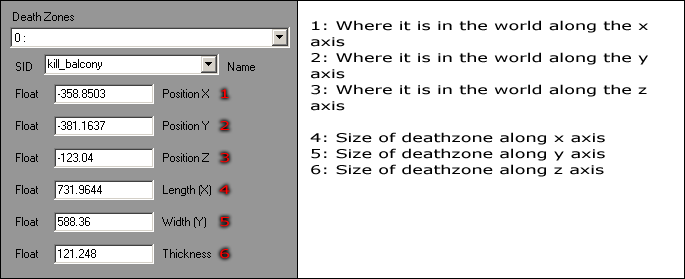
Step 4.) Adjust values 4, 5, and 6 to resize the death-zone. Bigger number equals bigger death-zone. Smaller Number equals smaller death-zone.
Step 5.) Go into Entitys BSP viewer and check to see if it is the right size.
Step 6.) Repeat Steps# 4 and 5 until the size is perfect.
You should now have a perfectly sized death-zone for whatever your needs may be. However you may have noticed that it isn't in the right position on your BSP anymore. We will fix this by adjusting the world coordinates of the death-zone.
[ Moving Death-Zones ]