To successfully complete my tutorial you will need the following:
3Ds Max
Photoshop
Entity 1.3.9 / Entity Ultimate Edition 1.6
Milkshape 3D
Max 1 Texporter
Max 2 Texporter
Max 3 Texporter
Max 4 Texporter
Max 5 Texporter
Max 6 Texporter
Max 7 Texporter
Max 8 Texporter
Max 9 32x Texporter
Max 9 64x Texporter
^^^ Download the correct version of Texporter corresponding to the version of 3ds Max that you have and install it to the correct directory! (I have 3ds max 7 and 3ds max 9)
Lets get started!
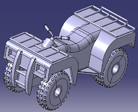
1. Open your model in 3ds max.
2. If your model is saved as a .max or a .char, save it as an obj (trust me, this will allow you to UVW correctly.)
NOTE: If your .Max or .Char file has more then one item then you cant UV them together. exporting as a .obj fixes the problem (as long as in import as a single item.)
It will transform your model from this:

Into This:

3. Go to the 'Modify' Tab to the right in 3ds max. In the 'Modifier List' select 'Unwrap UVW'.
Pic:

4. Click the Edit button and a window will pop up.
If you have 3ds max 9 then you have to select the folowing:

Now go to Mapping>Normal Mapping

Select a UV Mapping method that you like and you can customize it using a method that i will show you how to use.
This is a video that will tell you how to Break the UV (Download if you want to)
Download Here
Close the UV unwrap window.
6. Click the 'Utilities' tab and click the 'More' Button. a small window will pop up. scroll through until you see the 'Texporter.'
7. In the right panel, scroll through until you see the image size. Set the image size to one in halo (256, 512, 123, 64, etc.)
8. Press the 'Pick Object' Button and select your model in one of the view ports.
9. When the window showing your UV Map shows up, press the button at the top that looks like a Floppy Disk.
10. Save it wherever as a .bmp
11. In 3ds max, press the 'M' button on your keyboard, and it will take you take you to the materials. If you know how, link the saved bitmap with the model. If not then Download this video tutorial.
Download Here
12. Now use Photoshop to UV map the model.
Mine went from this:

To this:

13. Now save the bitmap.
Injection with Entity
1. Open your map in Entity.
2. Select a bitmap in entity that matches the size of your bitmap that you texported.
3. Duplicate it (if your using Entity 1.3.9, then name it whatever)
4. In Photoshop, flip the bitmap vertical. Check the file format of the bitmap in entity and use photoshop to save it in the .dds and correct format (Example: DXT 5)
5. Inject the bitmap.
6. OPTIONAL: Inject Dark's shader that fixes some model problems.
With 3ds still open, Export it as an .3DS format and open in Milkshape 3D.
7. In Entity, Select the model that you want to be replaced and export it.
8. In Milkshape 3D, make sure that the bottom view of the model is the model facing to your right (barrel of the gun is pointing right.) And export as a .obj over all of the models that you exported in entity.
9. In Entity, with the model still selected, click the blue + sign and select Import Meshes and locate your model.
If steps 2 - 9 where a bit confusing then this video will help.